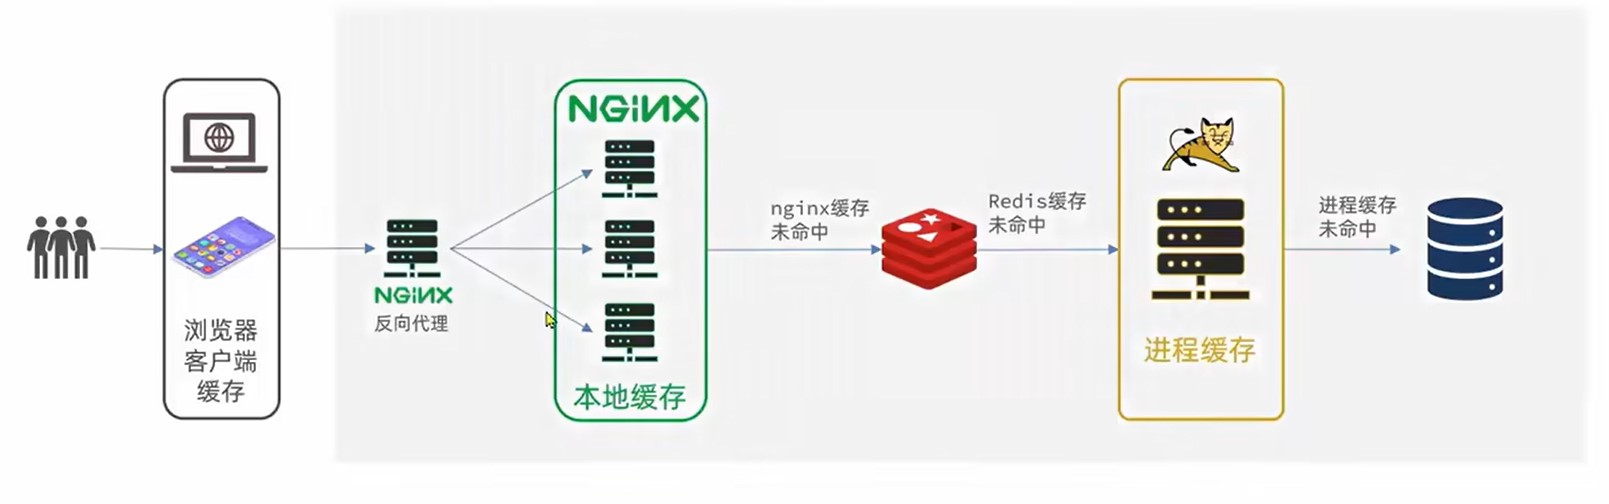
多级缓存概述
多级缓存是一种设计思路,充分利用请求的每个环境进行缓存,减少Tomcat的压力
- 一级缓存:浏览器客户端缓存,主要由cookie或LocalStroage
- 二级缓存:Nginx本地缓存
- 三级缓存:Redis缓存,主要由Nginx用Lua发起向Redis的询问
- 四级缓存:JVM缓存,进程缓存
- 五级缓存:本地数据库
JVM缓存
JVM是一种基于本地进程的缓存,相较于Redis其使用本地缓存,没有网络开销(Redis可能使用其他服务器)速度更快,但是不能数据共享.
常见的JVM缓存就是以静态变量的形式进行缓存,线程未结束,变量就不会被释放.
Spring官方推荐使用Caffeine,其内部就是使用静态Map
创建Caffeine
java
//创建构造器
Cache<String,String> cache = Caffeine.newBuilder().build();
创建构造器时可添加其他功能
- initialCapacity(long):存储初始化大小
- maximumSize(long):存储最大大小
- expireAfterWrite(Duration.ofSeconds(long)):存储存long秒后释放
一般在Config里创建Caffeine
java
@Configuration
public class CaffeineConfig {
    @Bean
    public Cache<String,String> XXCache(){
        Cache<String,String> cache = Caffeine.newBuilder()
                .initialCapacity(1)
                .maximumSize(1)
                .expireAfterWrite(Duration.ofSeconds(10))
                .build();
        return cache;
    }
}
使用Caffeine
java
//存数据
cache.put("键","值");
java
//取数据,若无数据返回Null
cache.getIfPresent("键");
//取数据,若无数据执行方法
cache.get("键",key->{
    return "";
});
Nginx使用Redis
Nginx配置修改
使用前需要导入OpenResty
```nginx
user nobody;
worker_processes 1;
error_log logs/error.log;
events {
worker_connections 1024;
}
http {
include mime.types;
default_type application/octet-stream;
sendfile on;
keepalive_timeout 65;
#导入lua模块
lua_package_path "user/local/openrestry/lualib/?.lua;;";
#导入c模块
lua_package_cpath "user/local/openrestry/lualib/?.so;;";
#设置集群
upstream tomcat-cluster{
server tomcatIp1:端口;
server tomcatIp2:端口;
}
server {
#监听端口和域名
listen 8081;
server_name localhost;
#映射位置
location / {
root html;
index index.html index.htm;
}
location /item{
proxy_pass http://tomcat-cluster;
}
#设置某接口监听由lua脚本控制
location ~ /api/item/(\d+){
# 默认响应类型
default_type application/json;
# 响应结果由lua/item.lua文件决定
content_by_lua_file lua/item.lua
}
error_page 500 502 503 504 /50x.html;
location = /50x.html {
root html;
}
}
}
```
导入common.lua
```lua
-- 导入redis
local redis = require('resty.redis')
-- 初始化redis
local red = redis:new()
red:set_timeouts(1000,1000,1000)
-- 关闭redis连接的工具方法,其实是放入连接池
local function close_redis(red)
local pool_max_idle_time = 10000 -- 连接的空闲时间,单位是毫秒
local pool_size = 100 --连接池大小
local ok, err = red:set_keepalive(pool_max_idle_time, pool_size)
if not ok then
ngx.log(ngx.ERR, "放入redis连接池失败: ", err)
end
end
-- 查询redis的方法 ip和port是redis地址,key是查询的key
local function read_redis(ip, port, key)
-- 获取一个连接
local ok, err = red:connect(ip, port)
if not ok then
ngx.log(ngx.ERR, "连接redis失败 : ", err)
return nil
end
-- 查询redis
local resp, err = red:get(key)
-- 查询失败处理
if not resp then
ngx.log(ngx.ERR, "查询Redis失败: ", err, ", key = " , key)
end
--得到的数据为空处理
if resp == ngx.null then
resp = nil
ngx.log(ngx.ERR, "查询Redis数据为空, key = ", key)
end
close_redis(red)
return resp
end
-- 封装函数,发送http请求,并解析响应
local function read_http(path, params)
local resp = ngx.location.capture(path,{
method = ngx.HTTP_GET,
args = params,
})
if not resp then
-- 记录错误信息,返回404
ngx.log(ngx.ERR, "http not found, path: ", path , ", args: ", args)
ngx.exit(404)
end
return resp.body
end
-- 将方法导出
local _M = {
read_http = read_http,
read_redis = read_redis
}
return _M
```
导入item.lua
```lua
-- 导入common库,获取发送http请求方法
local common = require('common')
local read_http = common.read_http
local read_redis = common.read_redis
-- 导入json库
local cjson = require('cjson')
-- 获取路径参数
local id = ngx.var[1]
-- 封装查询函数,先查redis,后发http
function read_data(key,path,params)
-- 先查redis
local resp = read_redis("127.0.0.1",6379,key)
-- 判断查询结果,未空则发http
if not resp then
ngx.log(ngx.ERR,"redis查询失败,尝试查询http,key:",key)
resp = read_http(path,params)
end
return resp
end
-- 查询
local itemJson = read_data("item.id"..id,"/item/"..id,nil)
local itemStockJson = read_data("item.stock.id"..id,"/item/stock/"..id,nil)
-- 组合json
local item = cjson.decode(itemJson)
local stock = cjson.decode(itemStockJson)
item.stock = stock.stock
item.sold = stock.sold
-- 返回结果
ngx.say(cjson.encode(item))
```
Nginx本地缓存
OpenResty为Nginx提供了shard dict的功能,在nginx的多个worker之间共享数据,实现缓存功能.
Nginx配置修改
在nginx.conf中添加配置
```nginx
开启本地缓存,名字为item_cache,大小为150m
lua_shard_dict item_cache 150m
```
```nginx
user nobody;
worker_processes 1;
error_log logs/error.log;
events {
worker_connections 1024;
}
http {
include mime.types;
default_type application/octet-stream;
sendfile on;
keepalive_timeout 65;
#导入lua模块
lua_package_path "user/local/openrestry/lualib/?.lua;;";
#导入c模块
lua_package_cpath "user/local/openrestry/lualib/?.so;;";
#开启本地缓存,名字为item_cache,大小为150m
lua_shard_dict item_cache 150m;
#设置集群
upstream tomcat-cluster{
server tomcatIp1:端口;
server tomcatIp2:端口;
}
server {
#监听端口和域名
listen 8081;
server_name localhost;
#映射位置
location / {
root html;
index index.html index.htm;
}
location /item{
proxy_pass http://tomcat-cluster;
}
#设置某接口监听由lua脚本控制
location ~ /api/item/(\d+){
# 默认响应类型
default_type application/json;
# 响应结果由lua/item.lua文件决定
content_by_lua_file lua/item.lua
}
error_page 500 502 503 504 /50x.html;
location = /50x.html {
root html;
}
}
}
```
本地缓存操作
在lua中操作
lua
-- 获取本地缓存对象
local item_cache = ngx.shared.item_cache
-- 存储,指定key,value,过期时间,单位s,默认0为永不过期
item_cache:set('key','value',1000)
-- 读取
local val = item_cache:get('key')
修改item.lua
如在上文的item.lua中,可先查询本性再查询redis,最后发送http
```lua
-- 导入common库,获取发送http请求方法
local common = require('common')
local read_http = common.read_http
local read_redis = common.read_redis
-- 导入json库
local cjson = require('cjson')
-- 获取本地缓存对象
local item_cache = ngx.shared.item_cache
-- 获取路径参数
local id = ngx.var[1]
-- 封装查询函数,先查redis,后发http
function read_data(key,expire,path,params)
-- 查询本地缓存
local val = item_cache:get(key)
if not val then
-- 查redis
ngx.log(ngx.ERR,"本性缓存查询失败,尝试查询redis,key:",key)
val = read_redis("127.0.0.1",6379,key)
-- 判断查询结果,未空则发http
if not val then
ngx.log(ngx.ERR,"redis查询失败,尝试查询http,key:",key)
val = read_http(path,params)
end
end
item_cache:set(key,val,expire)
return val
end
-- 查询
local itemJson = read_data("item.id"..id,1800,"/item/"..id,nil)
local itemStockJson = read_data("item.stock.id"..id,60,"/item/stock/"..id,nil)
-- 组合json
local item = cjson.decode(itemJson)
local stock = cjson.decode(itemStockJson)
item.stock = stock.stock
item.sold = stock.sold
-- 返回结果
ngx.say(cjson.encode(item))
```
缓存同步
MQ同步
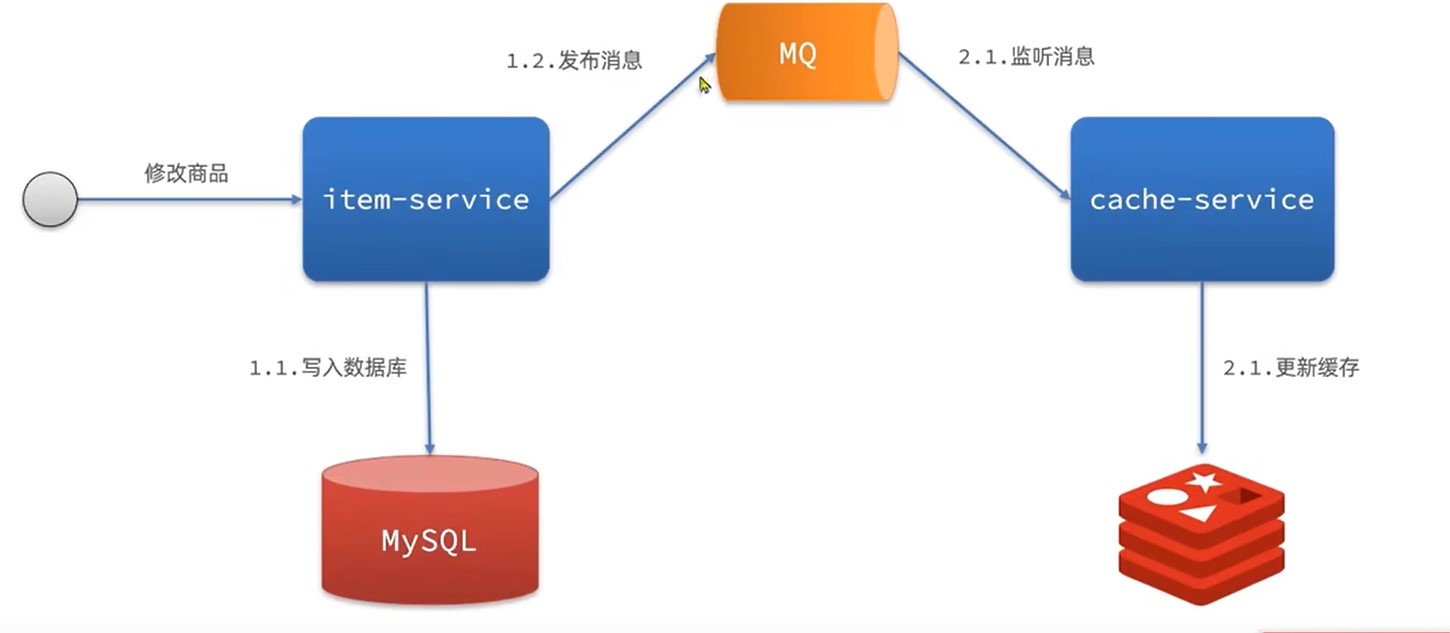
通过MQ,当item服务更新时,发布更新消息,cache服务更新redis
优点:快
缺点:依赖MQ可靠性
Cannel同步
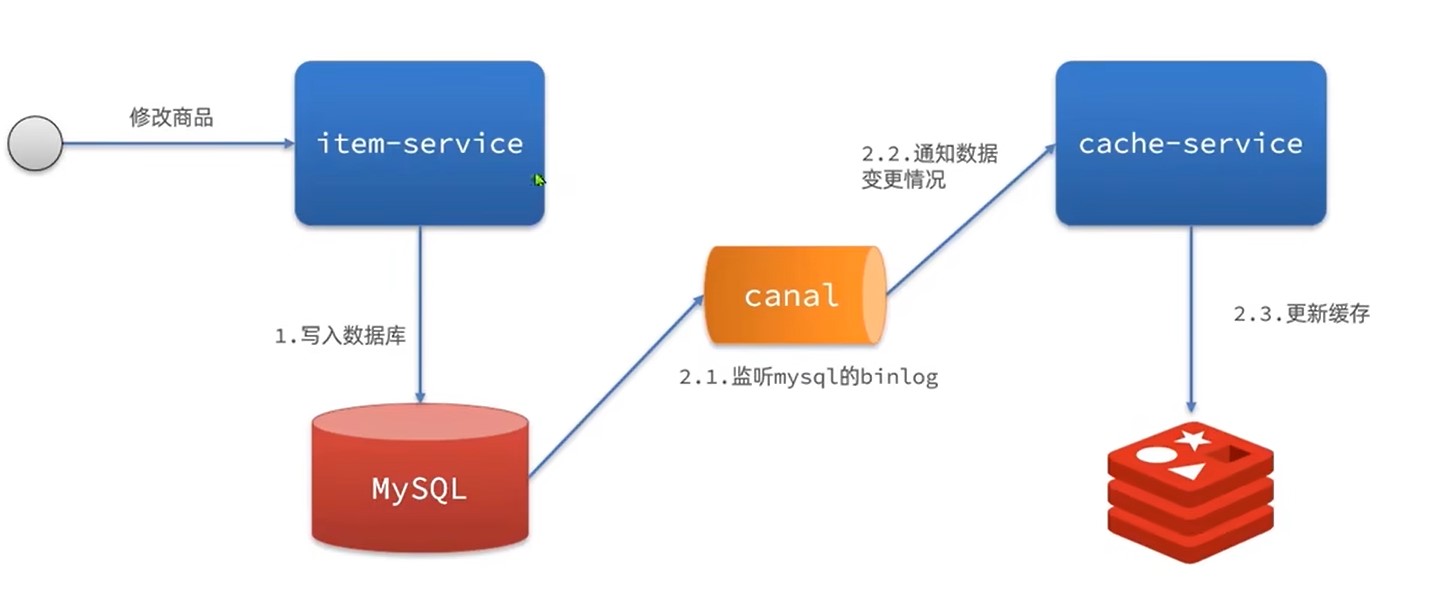
通过监听mysql的binlog,一旦触发增删改事件,则同步更新redis
优点:快,低耦合(不用再item服务写代码)
缺点:依赖数据库可靠性
安装Cannel
1.修改msql配置
sh
vi /tmp/mysql/conf/my.cnf
ini
log-bin=/var/lib/mysql/mysql-bin
binlog-do-db=heima
配置解读:
log-bin=/var/lib/mysql/mysql-bin:设置binary log文件的存放地址和文件名,叫做mysql-binbinlog-do-db=heima:指定对哪个database记录binary log events,这里记录heima这个库
### 2.设置用户权限
接下来添加一个仅用于数据同步的账户,出于安全考虑,这里仅提供对heima这个库的操作权限。
mysql
create user canal@'%' IDENTIFIED by 'canal';
GRANT SELECT, REPLICATION SLAVE, REPLICATION CLIENT,SUPER ON *.* TO 'canal'@'%' identified by 'canal';
FLUSH PRIVILEGES;
重启mysql容器即可
docker restart mysql
测试设置是否成功:在mysql控制台,或者Navicat中,输入命令:
show master status;
3.创建网络
我们需要创建一个网络,将MySQL、Canal、MQ放到同一个Docker网络中:
sh
docker network create heima
让mysql加入这个网络:
sh
docker network connect heima mysql
4.安装Cannel
网络上下载cannel,可以上传到虚拟机,然后通过命令导入:
docker load -i canal.tar
然后运行命令创建Canal容器:
sh
docker run -p 11111:11111 --name canal \
-e canal.destinations=heima \
-e canal.instance.master.address=mysql:3306  \
-e canal.instance.dbUsername=canal  \
-e canal.instance.dbPassword=canal  \
-e canal.instance.connectionCharset=UTF-8 \
-e canal.instance.tsdb.enable=true \
-e canal.instance.gtidon=false  \
-e canal.instance.filter.regex=heima\\..* \
--network heima \
-d canal/canal-server:v1.1.5
说明:
-p 11111:11111:这是canal的默认监听端口-e canal.instance.master.address=mysql:3306:数据库地址和端口,如果不知道mysql容器地址,可以通过docker inspect 容器id来查看-e canal.instance.dbUsername=canal:数据库用户名-e canal.instance.dbPassword=canal:数据库密码-e canal.instance.filter.regex=:要监听的表名称
表名称监听支持的语法:
mysql 数据解析关注的表,Perl正则表达式.
多个正则之间以逗号(,)分隔,转义符需要双斜杠(\\)
常见例子:
1.  所有表:.*   or  .*\\..*
2.  canal schema下所有表: canal\\..*
3.  canal下的以canal打头的表:canal\\.canal.*
4.  canal schema下的一张表:canal.test1
5.  多个规则组合使用然后以逗号隔开:canal\\..*,mysql.test1,mysql.test2
使用Cannel
导入依赖
xml
<dependency>
    <groupId>top.javatool</groupId>
    <artifactId>canal-spring-boot-starter</artifactId>
    <version>1.2.1-RELEASE</version>
</dependency>
编写配置
yaml
canal:
  destination: heima # canal的集群名字,要与安装canal时设置的名称一致
  server: 192.168.150.101:11111 # canal服务地址
修改实体类
通过@Id、@Column、等注解完成Item与数据库表字段的映射:
```java
package com.heima.item.pojo;
import com.baomidou.mybatisplus.annotation.IdType;
import com.baomidou.mybatisplus.annotation.TableField;
import com.baomidou.mybatisplus.annotation.TableId;
import com.baomidou.mybatisplus.annotation.TableName;
import lombok.Data;
import org.springframework.data.annotation.Id;
import org.springframework.data.annotation.Transient;
import javax.persistence.Column;
import java.util.Date;
@Data
@TableName("tb_item")
public class Item {
@TableId(type = IdType.AUTO)
@Id
private Long id;//商品id
@Column(name = "name")
private String name;//商品名称
private String title;//商品标题
private Long price;//价格(分)
private String image;//商品图片
private String category;//分类名称
private String brand;//品牌名称
private String spec;//规格
private Integer status;//商品状态 1-正常,2-下架
private Date createTime;//创建时间
private Date updateTime;//更新时间
@TableField(exist = false)
@Transient
private Integer stock;
@TableField(exist = false)
@Transient
private Integer sold;
}
```
编写监听类
通过实现EntryHandler<T>接口编写监听器,监听Canal消息。注意两点:
- 实现类通过
@CanalTable("tb_item")指定监听的表信息 - EntryHandler的泛型是与表对应的实体类
```java
@CanalTable("tb_item")
@Component
public class ItemHandler implements EntryHandler
@Autowired
private RedisHandler redisHandler;
@Autowired
private Cache<Long, Item> itemCache;

//发生新增时触发事件
@Override
public void insert(Item item) {
    // 写数据到JVM进程缓存
    ....
    // 写数据到redis
    ...
}

//发生更新时触发事件
@Override
public void update(Item before, Item after) {
    // 写数据到JVM进程缓存
    ...
    // 写数据到redis
    ...
}

//发生删除时触发事件
@Override
public void delete(Item item) {
    // 删除数据到JVM进程缓存
    ...
    // 删除数据到redis
    ...
}
}
```